SIX KILLERS OF NIGHT SKY PHOTOS. HOW CAN YOU SAVE FROM THEM?
 One of the best things about night photography is how much it says goodbye — you don’t need special weather conditions to create truly beautiful images. Night and city lights give you everything you can work with.
But if you are trying to photograph the starry night sky, that’s another story. The reality is that the picture of the night sky is very fastidious. If you are going to conduct such a survey, be prepared that your possibilities will be very limited, as well as to some failures.
For photographs of the night sky you have to go to remote areas, so often you need to travel long distances to get the “same” picture. You also reduce valuable sleep time, so let’s try to avoid some of these same failures.Read about the six biggest problems you will encounter, as well as how to avoid them, or cope with them.
Night Sky Photography Killer # 1: The Moon
Nothing destroys the possibilities for photographing the night sky more than the moon. It may surprise you, but it is true. Why so? Light emanating from even a quarter of the moon is more than 100 times stronger than starlight. Therefore, it will simply spoil the picture.
But the presence of the moon in the sky also has its advantages. For example, it may illuminate your foreground. But when it comes to photographing stars, the moon is a natural killer. Moreover, it is in the night sky most of the month. Do not plan to shoot the night sky more than 4-5 days from and before the new moon. Shooting during the full moon is out of the question. And it takes about 70% of the year from the time for photographing the night sky. So we have huge limitations.
So how to avoid problems with the moon? There are two ways, and for both you will need a website called TimeAndDate.com. First of all, he will talk about the phases of the moon. Thus you can plan your shooting directly in the area of the new moon.
If you are completely unfamiliar with the moon phases, the new moon is a time when there is no moon in the sky at night. After the new moon, the moon goes into a crescent, then a quarter, and then after a few weeks at full moon (and then the process continues reversely). The nights near the new moon are critically important, because this not only limits the light emanating from the moon, but apart from this during the new phase it will not even be visible in the night sky.
The moon travels across the sky during the day during the new moon phase and at night during the full moon. The closer you are to the new moon, the less time during which the moon in general will be in the sky at night.
This leads us to the second way to solve the problem: to take into account the time of the rising and setting of the moon. Make sure that all other conditions also contribute to good shooting (i.e. time of complete darkness, weather conditions, the movement of stars, etc.), which we will now discuss.
Killer # 2: light pollution
Perhaps you read this headline and thought: “meh.” You already know for a long time that you need to be in a dark place, far from urban light sources, in order to successfully capture the night sky. But you may be surprised at how dark it should be. You can not just go out of town for half an hour and expect that it will be dark enough for night shooting.
What you need to do is use the Dark Site Finder resource to prevent light pollution. Basically, these are Google maps with different colors overlapping, which tell you how much light pollution there will be in a given location. The darker the color, the better (i.e. the less light pollution).
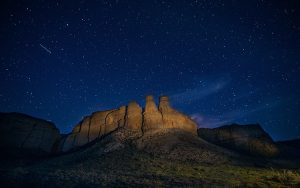
How pitch darkness should be? Take a look at the picture below.
This photo was taken in the blue area from the above resource, which is the fifth darkest area out of 15 different levels. The light pollution that you see in the lower left part of the figure was only from a small city, shaded by green on the map, which was located at a distance of 15-20 kilometers.
In this case, you could not see the light pollution before you made the frame – everything seemed completely dark, so be sure to make sure that your location for shooting is really very dark.
Killer number 3: the movement of stars
If you are not familiar with astrophotography, you might think that it is enough just to open the shutter for a minute or two to provide enough light in the camera to achieve the correct exposure. But you cannot do this because the stars are moving. And they do it much faster than you think.
If you are shooting a night sky with a long exposure, the stars will move while you open the shutter. In the picture it will look like small blurry tracks, the stars just look blurry.