HOW TO INCREASE SHARPNESS PHOTOS IN PHOTOSHOP?
 Sharpening photos in Adobe Photoshop is an extensive topic: there are many ways to make a picture sharper, and they all have a right to exist. Today we will talk about the method that is often used by professional photographers in practice.
To work, we need a High Pass filter, which is in the menu Filter -> Other (Other) -> High Pass (Color Contrast). The principle of its operation is to highlight the boundaries of the objects of the image, because of what the viewer will feel that the photo has become clearer. How to sharpen a photo with it? The easiest way to describe the process is in a few simple steps.
Step 1. Copy the image to a new layer. To do this, right-click the photo and select Duplicate Layer, or use the keyboard shortcut Ctrl + J.
Step 2. In the menu Image (Image) -> Adjustments (Correction) select Desaturate (discolor). Or use the keyboard shortcut Ctrl + Shift + U.
Step 3. In the Filter -> Other menu, select the High Pass item.
Step 4. In the filter window, select its radius. For images of small size (from 500 to 900 in width), a radius of 0.2 to 0.5 is used. The larger the image, the larger the radius. For full-size photos, a radius of 1 to 3 is used, depending on the size of the plan. For small plans, this is a radius from 1 to 1.5, for close-ups from 1.5 to 3. For this photo I used a radius of 0.5.
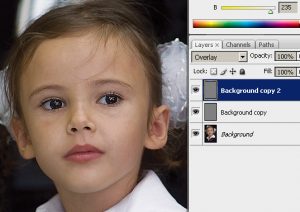
Step 5. Select in the Layers palette (Layers) the Overlay blending mode, as shown in the figure below, and analyze the result. There should not be a white edging, which is considered a technical marriage and in professional slang is called “overhaul”.
Step 6. If a white halo appears, go back to the Desaturate item in the History palette. Then again open the High Pass filter (Color Contrast) and select the radius again.
Step 7. When the radius is selected, in the Layer menu (Layer), select the command Flatten Image.
Step 8. If you do not have enough sharpness, duplicate the filter layer (Ctrl + J or right-click on the image and select Duplicate Layer). I duplicated the filter layer once:
Step 9. Save the image via File (File) -> Save As (Save As).
Done!