PHOTO ASSEMBLY OF THE FACE: HOW TO REPLACE A FAILED GRIMASO BY A BEAUTIFUL SMILE
 Today, visiting my blog are American photographers Nina and Cecilia, whose photos I’ve already shown. They will tell about how to make photomontage of the face. Some of the actions described below will save you from headaches in situations where someone in the group portrait blinked, twisted his face, or turned away. Especially often such situations happen with small children. According to Nina and Cecilia, many clients do not even know that the face was taken from another photo. The task of the photographer – to replace the face so that no one noticed.
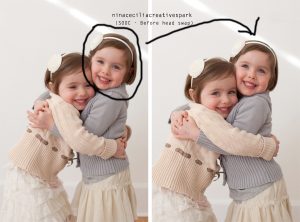
So, the picture above shows two photos used for the photomontage. The photo on the right is the main one, only the face is taken from the photo on the left.
All pictures are available in large size. Click to enlarge.
First you need to open both photos in Photoshop. Then drag the photo from which the face will be taken to the main photo. In the layers palette, you can see that the inserted photo was the first layer (Layer 1). Then you need to change the opacity of the layer to 50%. By changing this parameter, you can precisely combine the “successful” face with the “unsuccessful” one.
Move the top layer (Layer 1) to the “unfortunate” face and align the faces as accurately as possible, so that you don’t have to mess around with clothes and hair. The easiest way to combine adjacent frames made from one point and with the same focal length.
Change the opacity back to 100%. Add a layer mask.
Click on the white mask box next to layer 1 – so you activate it. Then press CTRL + I. The white square should turn black. After you do this, the top image (Layer 1) with a good face will be completely hidden.
Now you need to show on the top layer a successful face. To do this, draw on the mask with a brush. All brush parameters in the top panel should be 100%. The color of the brush should be white. Now, brush over the face to be adjusted – part of the mask will be wiped off, and a “successful” face from the top layer will appear.
If you have erased too many masks, and unnecessary details have appeared, change the brush color to black, as shown by arrow A. You can change the brush color to black or white to draw everything neatly. Arrow B shows which part of the top photo (with a “successful” face) I connected to the bottom. This piece is white. Having finished the photo montage of the face, be sure to enlarge the resulting image to the maximum size and make sure that the lines of clothing and hair match.
That’s all! Nothing complicated, right? 🙂
